|
|
|
 |
 |
Here are instructions how to start using CVSProxy in Windows environment. This is not a complete help for CVS usage, but some steps that will help you to get some "real results" and will help you to become interested in CVS world investigating. For more detailed instructions, tips, hints, FAQs see: www.wincvs.org, www.cvsnt.org. So, let's push it!
- Download CVS server.
Go to www.cvsnt.org, select last stable release, download it.
- Configure your CVS server.
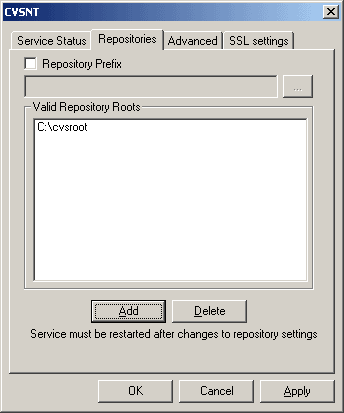
After successful installation, launch CVSNT configuration utility (Programs\CVSNT\Configure server). Select "Repositories" page. Repository roots list should be empty. You have to create repository root, i.e. allocate place on the server for CVS storage. To do this press "add" button. Then press browse button and point location for CVS storage or type it. In my example I type "C:\cvsroot". Press OK. CVS NT prompts you to create folder if it does not exist. After that your CVS root list is displayed, as it is shown on the picture below.

Then press "Apply" button and restart service. To do this, go to the "Service Status" page, stop both services (CVS service, CVS Lock service) and start them again. Please note that sometimes to apply changes it is better to restart PC.
- Download and install CVSProxy.
- Start your IDE, in this howto we use VS .NET 2003.
- Open your existing solution or create a new one for testing. Please note that the solution has to be out of control of other SCC systems.
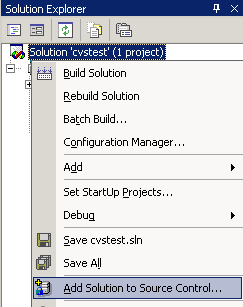
- Add your solution to source control. Right click the solution in solution explorer and select "Add solution to source control".

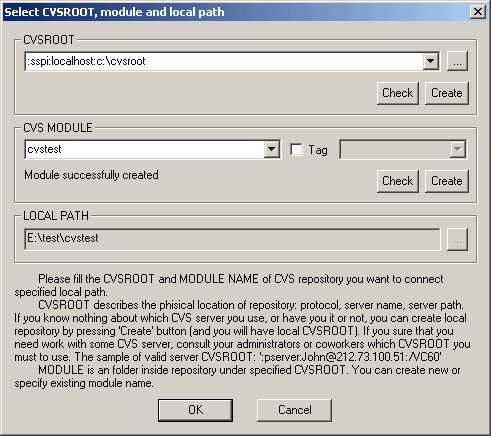
After that the system displays "CVS connect dialog", in which you should indicate two important things: CVSROOT, and module. CVSROOT is the CVS server address. General format of CVSROOT is:
:protocol:[[username]:[password]]@[server]:repository_root
All its parts are self-describing, except protocol. Protocol is a method you choose to access repository. One protocol for accessing local repositories ":local:" and several protocols for accessing CVS server are available. Protocols :pserver: and :sspi: are the most useful. The first is fast and simple, while the second is secure. For our case we can choose several valid CVSROOT's:
- local
:local:C:\cvsroot
- pserver
:pserver:Serg@localhost:C:\cvsroot
- sspi
:sspi:localhost:C:\cvsroot
Let's continue with server access and sspi protocol. Please note that you should replace Serg by your user name. Module is a folder inside repository root, usually it is the same folder where the solution is located. You can use module different from the one suggested by IDE, but usually the suggested one is ok. Press create for module, and then ok for dialog. CVS performs some operations, and after that your solution becomes source controlled. The example of this dialog is presented on the picture below.

- Try to work with the project, checkin\checkout files, compare versions, browse history.
- To get a code from source control, open IDE and select menu "File\Source Control\Open from source control". Type CVSROOT and module again. The operation is similar to "add to source control" operation, the only difference is that you should specify local folder where you want to get sources from. For my case I select E:\test\cvstest_2. Press ok, and now another copy of your source is on a local drive.
- Try to open both projects (from two different locations). Try to simulate developers' work, checkout the same file, simulate conflicts and see how all this works.
|
|