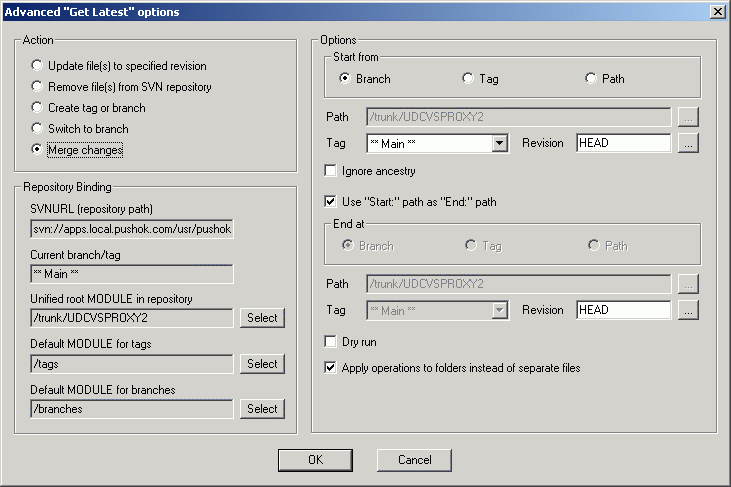
Merging is used for getting modifications performed in another branch for your current branch. To merge branches perform the operation "Get Latest Version" by opening the advanced options window. Then choose the 'Merge changes' action.

It is important to understand how branching and merging works in Subversion before you start using it. It is highly recommended that you read the chapter 'Branching and Merging' in the Subversion documentation which gives a full description, and many examples of how it is used.
There are two common use cases for merging which are handled in slightly different ways, as described below.
If you simply want to merge some range of revisions from a branch to your working copy, do the following steps.
- Select the required branch using the 'Start from' parameters group. You can choose a branch/tag name from the dropdown list or specify a module from the repository (click the '...' button to use Repository browser dialog). The specified module should be an Unified root MODULE of the branch being merged.
- The 'End at' module should be the same as the 'Start from' module, so check the option 'Use Start: as End:'.
- Then specify the start and the end revisions. You may click the '...' button to select revision using 'Project history' dialog. Note that 'Merge' in Subversion is closely related to 'Diff', so if you want to merge some changes made in revision N, you should specify at least revision (N−1) as the start for the comparison.
- Make sure that all other merge options ('Dry run' etc.) are set correctly.
- After setting preferences for merging press "OK". Then press "OK" in the 'Get latest version' window. The requested operation will be performed.
In the case described above the start and the end modules was the same. The another case is a comparison of two different trees. For example, you have made a feature branch. All trunk changes have been ported to this branch, week by week, and when the feature is complete, you want to merge it back into the trunk. Because you have kept the feature branch synchronized with the trunk, the latest versions of branch and trunk will be absolutely identical except for your branch changes. So you would merge by comparing the branch with the trunk.
To merge the feature branch back into the trunk, you should apply this operation to a working copy of the trunk.
- Select the '** Main **' branch in the 'Start from' parameters group or specify the path to the Unified root MODULE of the trunk (the same way as described above).
- Clear the 'Use Start: as End:' checkbox in order to the 'End at' parameters became accessible.
- In the 'End at' parameters group select the feature branch.
- In the 'Revision' fields for the both 'Start from' and 'End at' groups, enter the last revision number at which the two trees were synchronized.
- Make sure that all other merge options ('Dry run' etc.) are set correctly.
- Press "OK". Then press "OK" in the 'Get latest version' window. The requested operation will be performed.
If you want to preview what will happen during the merge operation, check the 'Dry run' box. With this option turned on, the merge operation will be preformed, but it does not modify the working copy at all. It only shows you a list of the files that will be changed and notifies about possible conflicts.
Most of the time you want merge to take account of the file's history, so that changes relative to a common ancestor are merged. Sometimes you may need to merge files which are perhaps related, but do not have common ancestor in your repository. For example you may have imported versions 1 and 2 of a third party library into two separate directories. Although they are logically related, Subversion has no knowledge of this because it only sees the files you imported. If you attempt to merge the difference between these two trees you would see a complete removal followed by a complete add. To make Subversion use only path-based differences rather than history-based differences, check the 'Ignore ancestry' box.
Although Subversion allows to perform switch and merge operations with separate files, usually these operations are applied to directories.
When the option 'Apply operations to folders instead of separate files' is checked, SVNSCC tries to preform the requested operation with the most top folder wich contains all the affected files (with a recursion to subfolders). If you know what you are doing, you can uncheck this option and apply the operation only to those files which was selected in the 'Get latest version' dialog. But generally it's not recommended because such operation is very slow and can lead to some unwanted side effects.
Note that in order to perform a merge operation the 'Unified root MODULE' field must be filled correctly. For a more detailed explanation of this parameter, refer to the topic 'Get Latest' options.