Before this operation make sure that CVS already contains previously added project. To get the project from source control system open your IDE without opening other projects in it. After this:
[VS .NET]
Select
[VS]
Select . A standard workspace will open with a new button 'Source Control' in it. Press this button.
[VB]
Select
[PowerBuilder]
PowerBuilder is a specific system for this operation. See an article explaining Source Control and PowerBuilder. In contrast to other systems, in PB there is nothing similar to 'Open from source control' command. To our opinion that is so due to the fact that PB libraries (.pbl) are not connected to source control. But instead all objects exported from PB libraries are connected to source control. Probably, reassembling of .pbl file from its components is impossible, and hence it is not possible to recreate the project only from source control. Thus, to deploy the project from another PC you should copy the entire project from that PC (for example, from which it was added). You can copy either the entire folder or pbw/pbt/pbl files only. It is IMPORTANT that you should NOT copy 'CVS sandboxes' (CVS subfolders that exist in each original folder). You can delete them after copying.
As a result you will have a folder containing pbw/pbt/pfl files and not containing CVS subfolders. Now you have to bind workspace to CVS. Open copied workspace in PowerBuilder. Right click on the workspace entry, choose 'Properties'. Open 'SourceControl' page. Choose 'Pushok CVS proxy' as source control system. Please make sure that options are configured as described at IDE tips page. Then enter 'Local Root Directory' (you can use '..' button to choose it in the folder browser window). Normally, local root directory is the same folder where your workspace/targets/libraries are located. And at last press '..' button next to the 'Project' field.
After these operations you will see a dialog box already familiar to you.

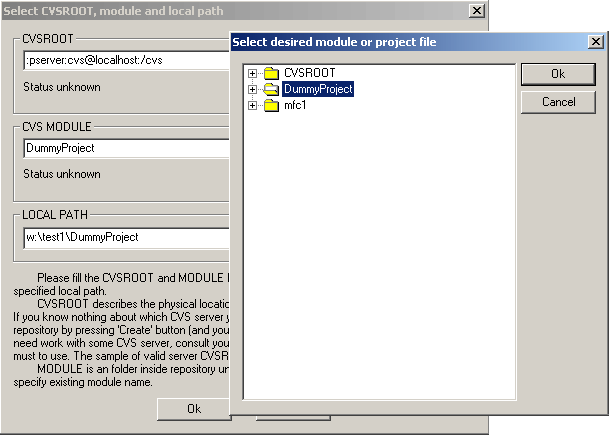
To open the project you have to specify CVSROOT again. Then select module in which the project file is located. Note that if the project file is located in a subfolder of the module root you must select this subfolder, but not the module root itself. You can use the repository view window by pressing '...' next to the module input field instead of entering the module name manually. Mind that you do not have to create the module, since you open a project already added to CVS. However press the button "CHECK" to make sure that the data are entered correctly.
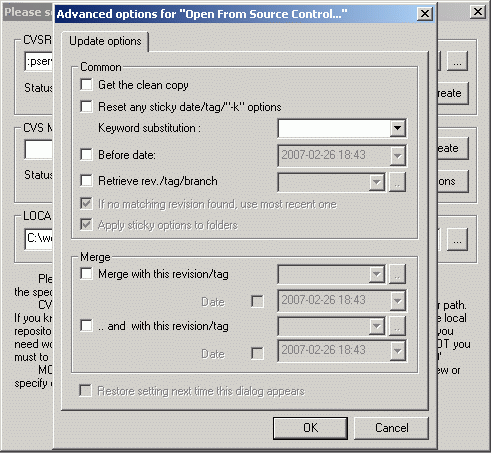
Also you can get solution with advanced options. Push "Advanced options" button and you can see next dialog.

You can tune here advanced options before getting solution. More about tuning advanced options you can learn on this page.
[VS/VB/VS.NET]
Note that this time the field LOCAL PATH can be edited. This means that you have to specify the location where you want the source files from CVS to be placed. Two things are important:
- The selected local folder should be empty, or it should not exist.
- The module name is directly connected with the path. In other words, for the module DummyProject the local path must be 'C:\DummyProject' or 'C:\Work\DummyProject', but not 'C:\' or 'C:\Work'. You can replace some part of the path corresponding to the root module if necessary. For example, the local path for the module can be 'C:\MyDummyProject'. But to avoid mess, you should better avoid changing of module names and their displaying on the local disk.
So, after selecting necessary data and pressing OK, IDE will get the list of files in this module, find project files there, and upload them to your local disk. Depending on the system the results can be the following:
[VS .NET]
If this module contains only one project file, the project will be get at once. Otherwise the system will ask you to specify the project in this module that you want to get.
[VS]
The system will get all project files at once and will return to the project workspace, having chosen the catalog containing the downloaded project files. You have to select a project file for opening, even if there is only one file in the catalog.
[VB]
If this module contains only one project file, the project will be get at once. Otherwise the system will ask you to specify the project in this module that you want to get.
[PowerBuilder]
Press 'OK' to close 'Bind to CVS' dialog. Then press 'Connect' button and 'Ok' to close workspace properties. After that PB will notify you that all files have "need update" status, that is, they are controlled but need updating. Right click on them and select 'Get latest version'. After this you can work with the project. Please note that 'user' field in PB workspace properties is not effective, since in CVS user is 'hard coded' into CVSROOT.
After successful operation performance you can continue your work. Note that window 'Bind to CVS' can appear several times, if IDE does not know either 'LOCAL PATH' or 'Module'. Each time you have to specify these two parameters.
Note that to open this project next time you will simply have to open it as usual. That is, you do not have to repeat this operation again.